BMW E46 3-Series Instrument Cluster Clock Fix
Last updated 8/1/2011
You might know me as the guy who documented a fix for GM5 modules with relay related door lock and window issues. www.bmwgm5.com. Now that I can't set the clock on my cars instrument cluster I have come up with a fix for that as well. I hope you find it useful. 12/24/2009 update. I got my hands on a used cluster, P/N 61.35-6 940 901, and this fix does not apply because the PC board is completely different. I'm not sure if this is of any help, but, the back cover on the cluster that I designed the fix for is black (P/N 8.387.613). I am not sure if this holds true for other clusters.
Are you having problems setting the time on your instrument cluster clock? Well I did and not having the correct time was driving me nuts. I have come up with a fix and created this web page.
This fix does not completely restore functionality, but, it's good enough to at least set the clock.
First of all a description of the problem. Turning the right instrument cluster stalk to the left or right does not change the time. What I noticed when the problem started on my car was there was a click when I was turning the stalk and the digits stopped changing. I then turned it the other way and it clicked again. Pressing the stalk changed between 12hr and 24hr just fine.
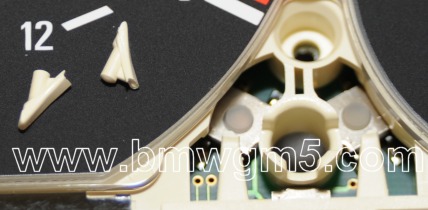
I took my instrument cluster apart to find out what was causing the problem and this is what I found. Two small plastic pieces were rattling around inside the cluster. I got the pieces out and they are on the left of the picture below.
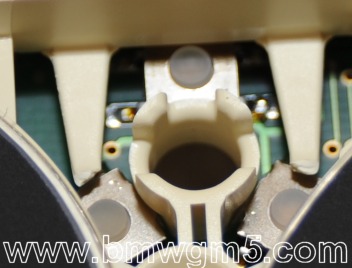
Those two plastic pieces broke off from two arms molded into the plastic frame that push down on the two buttons for setting the time. You can see in the picture below where the pieces were. The 12/24 hour button is at the top of the shaft hole and the two time set buttons are at the bottom left and right.
It's too hard to try and reattach the plastic pieces (they would just break off again.) Of course BMW doesn't sell anything smaller than an entire instrument cluster. I wasn't interested in paying $727.48 (from ECS Tuning) for a new instrument cluster (p/n 62.11-6 985 651) and another $120 to have it coded by the dealer. I can live with a little inconvience, but, I wanted my clock set. Ok, so this is what I came up with. Since pushing the stalk still worked for changing the time between 12hr and 24hr mode I though, hey, why not change that button to be time forward instead. I would lose the ability to change between 12/24 hour mode (can be changed via diag computer connected to the car) and time reverse (which didn't work anyway). Ok, so I opened up the cluster and made the changes and it works like a champ!
This worked on my instrument cluster from a MY 1999 323i. It may not work on other cars or some of the steps will be different. I don't know for sure.
The following is my DIY on how to fix the instrument cluster clock set.
Tools required:
Torx T-10 Screwdriver
Torx T-20 Screwdriver
30AWG wire (about an inch)
Wire strippers for 30AWG wire
Soldering iron
Solder
Step 1.
If you have a preference for 12 hour or 24 hour modes set it now!
Step 2.
Disconnect the battery negative terminal.
Step 3.
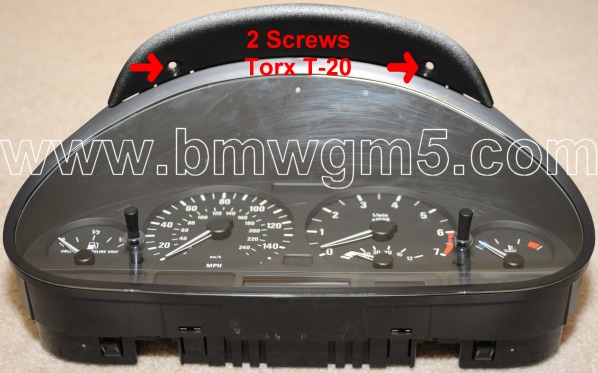
Using the Torx T-20 screwdriver remove the two screws holding the instrument
cluster in. The screws are located above the above the instrument cluster and
slightly forward. You can see where the screws went in the picture below of
my cluster already removed from my car.
Step 4.
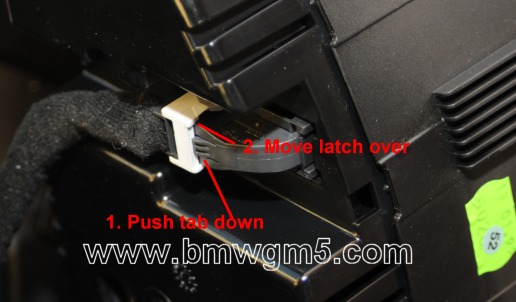
Pull the instrment cluster forward and slide it to the left away from the steering
wheel. There are two cables attached to the back of the instrument cluster that
need to be removed. There is a trick to removing these connectors. In the picture
below it shows a plastic tab that needs to be pushed down before the latch lever
can be moved over and rotated out of the way. When the latch lever is moved
over 90 degrees it will fall away from the mating connector. Once both connectors
are removed the instrument cluster will be free from the car.
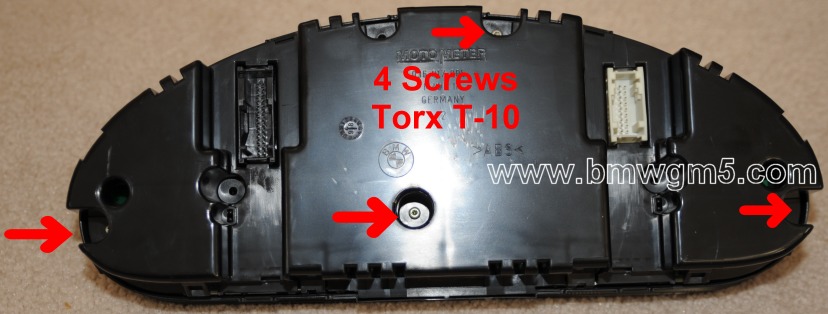
Step 5.
Using a Torx T-10 screwdriver remove the four screws holding the back cover
of the instrument cluster on. It looks like there are holes from an additional
three screws. Your cluster may have more or less screws in different places.
Step 6.
Remove the back of the instrument cluster to reveal the circuit board. There
are four plastic tabs that need to be pressed in to get the back cover off.
It should be obvious where they and how to do it so I didn't take a picture.
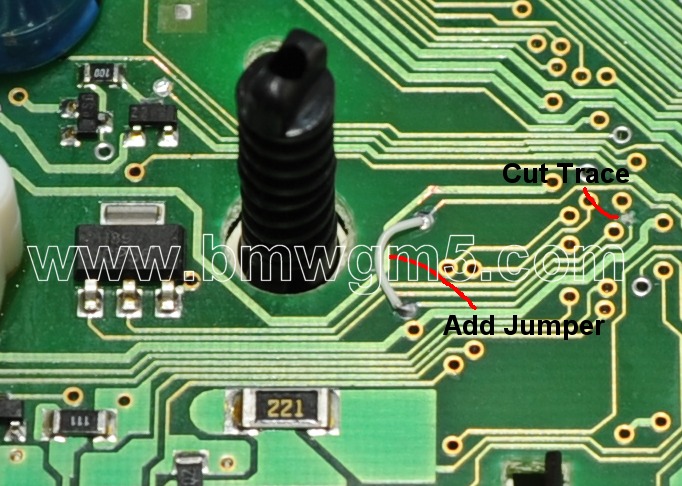
Step 7.
Ok, here is the hard part. A circuit board trace needs to be cut, solder mask
needs to be scraped off from around two vias and a jumper wire added between
them. Since there were multiple versions of the instrument
cluster made your circuit board may differ significantly from my picture below. This cluster is by MotorMeter and most of them are relatively similar. Clusters made by Bosch are very different
I just got my hands on a used instrument cluster, 61.35-6
940 901 for trying some new LEDs gauge backlight mod and this unit has a completely
different board inside and this mod does not apply. If your cluster doesn't match my pictures checkout
this post of the E46fanatics web siteE46fanatics clock fix
First the hard one.
Cut the trace shown below. This trace is for the 12/24hr mode select and needs
to be disconnected from the microprocessor. Next find the two vias where the
jumper wire will be added. Using small flat jewelers screwdriver gently scrape
away the light green coating over the ring of the hole until bright copper is
exposed. Now solder a wire between the two holes. I used 30AWG solid conductor
wire. That's it.
Step 8.
Put the back cover back on and screw it back together.
Step 9.
Reconnect the two connectors to the back of the instrument cluster.
Step 10.
Put the instrument cluster back into position and screw it into place using
the two T-20 screws.
Step 11.
Reconnect the battery.
Step 12.
Done. Now set the time by pushing in on the right stalk. It will no longer change
between 12 hour and 24 hour modes, but, advance the time.